Jan 13, 2014

be true. (step by step tutorial)

(texto en español al final de la entrada)

Happy Monday!

I hope you are all having a great start of the year. I can't believe it is again January. Where did the last year go?And what about your new year's resolutions? Already on the trash? Hope not!! hehe As always my main scrapbooking resolutions are try new things and share more of my work. So, today I am sharing this beautiful page (as part as my resolution checklist) that I made with my all time favorite line: 5th and Frolic from Dear Lizzy. Ok. It may be not a new thing but who doesn't have a special line which can resist using it again and again? I bet we all have one. So this is the page:


Step 1: I started creating the background by using a triangle piece of cardstock as a mask. I cut out a triangle from the pattern paper (from the same collection) and then I used it to make a stencil on a white piece of cardstock. With this technique you really can use any form or pattern that you can imagine.


Step 2: Then, I used this as a mask to paint triangles all over the page. To make them pop (dimensional) I mixed some white acrylic paint and molding paste and then I applied the mix with a brush. Once it dries you achieve, with this tone on tone technique, a beautiful texture.


Step 3: Ok. So now that the background is ready I grabbed the rest of the elements that I wanted to incorporate on my page: a photo, some pieces of pattern paper, wood veneers, stickers and of course a roller stamp.


Step 4: The next step would be to decide where to place the photo and then adding the papers as layers behind it. Some tricks: you can use pop dots to create more dimension and also you can place a glassine bag between the papers to make them pop (that is what I did here).


Step 5: To complete the page I added here and there some embellishments such as that cute little cloth pin, the feathers or the fox sticker. To finish the page, I painted my title and sprayed some Mr Huey's splashes. In case you were wondering, I painted my title with nail polish that is why it looks so much brighter!


Done. Easy right? Here I leave you some detail shots of the page.


xoxo

Boo

/////////////////////////////////////////////////////////////////////////////////////////////////////////////////////////////////////////////////////////

¡Feliz Lunes! 

Espero que todos estéis teniendo un gran comienzo de año. No puedo creer sea otra vez Enero. ¿Adónde se fue el año pasado? ¿Ya tenéis propósitos de año nuevo? ¿O acabaron ya en la basura? ¡Espero que no! jeje Como siempre mis principales propósitos de scrapbooking vuelven a ser probar cosas nuevas y compartir más de mi trabajo. Por lo tanto, hoy os quería enseñar esta página (como parte de mi lista de propósitos) que hice con mi colección favorita de siempre: 5th and Frolic de DearLizzy . Vale. Puede que eso no sea algo nuevo, pero ¿quien no tiene una colección favorita a la que no puede resistirse a usar una y otra vez ? Apuesto a que todos tenemos una. Así que esta es la página.

Paso 1: Empecé por crear mi fondo utilizando una pieza de cartulina en forma de triángulo como máscara. La obtuve cortando un triángulo desde uno de los papeles de la misma colección y la usé para hacer una máscara en un pedazo blanco de cartulina. Con esta técnica se puede utilizar realmente cualquier forma o patrón que uno pueda imaginar.
Paso 2: Después, empleé esto como una máscara para pintar triángulos por toda la página. Para que tuvieran cierto volumen mezclé un poco de pintura acrílica blanca y pasta moldeable y luego apliqué la mezcla con un pincel. Una vez seca queda una textura super bonita con esta técnica de tono sobre tono.
Paso 3: El fondo está listo. Ahora toca elegir el resto de elementos que quería incorporar en mi página. Mi foto, algunos trozos de papel, las formas de madera, pegatinas, y por supuesto, un sello de rodillo.
Paso 4: El siguiente paso sería decidir dónde colocar mi foto. Y a continuación, añadir los papeles formando capas detrás de la foto.
Algunos trucos: se puede utilizar taquitos dimensionales para crear más dimensión y también se puede colocar una bolsa de papel o glassine entre los papeles para que haya más dimensión (Eso es lo que hice aquí).
Paso 5: Para completar la página añadí aquí y allá algunos adornos como ese pequeña pinza , las plumas color pastel o la pegatina de zorro. Para terminar, añadí mi título y salpicaduras de Mr Huey. Si os estáis preguntando con que pinté mi título, pues os lo dire: con esmalte de uñas para que fuera mucho más brillante. jeje

Hecho. Fácil ¿no? Aquí os dejo algunas fotos de detalle de la página.

xoxo

Boo

Jan 9, 2014

Oh Christmas Tree

(texto en español al final de la entrada)

Hello,

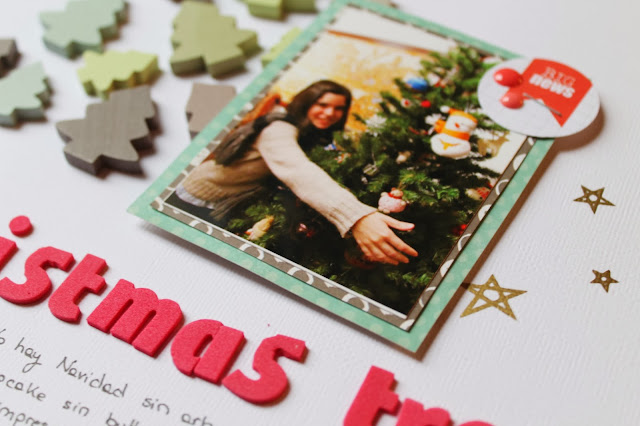
This is my favorite layout from these Christmas. It may be not my favorite because the story that it tells but because how it turned out. I love the minimalist, bright and brilliant look!


For this page I used some cute wood Christmas trees that I found on a retail shop in my hometown(the name of the shop is Casa). I used the whole package which was around 3 euros more or less and they are a little bit bigger and thicker than the SC wood veneers.


I placed them making the shape of a bigger tree and then I glued them down. On top of them I added my photo with a back paper and a couple of enamel dots and a tag.


I added a pop of red with my title down the tree. Of course a Christmas tree it is not completed without a star on top, right? Just a gold star paper clip would be the perfect match for that. To make it more coherent, I added a pop of gold with some gold rubb-ons.  Easy but pretty!


xoxo

Boo

///////////////////////////////////////////////////////////////////////////////////////////////////////////////////////////////////////////////////////////////////

Hola,

Os presento mi layout preferido de estas navidades, tal vez no sea mi preferido por la historia que narra, sino por como quedó la pagina. ¡Me encanta el aspecto minimalista, luminoso y brillante!

Para esta página usé unos monisimos arbolitos de madera de navidad que encontré en una tienda en mi ciudad llamada Casa. Empleé todo el paquete, que costaba alrededor de 3 euros más o menos y los arbolitos son un poco más grandes y más gruesos que las chapas de madera SC a las que estoy acostumbrada. 
Los dispuse haciendo la forma de un árbol grande y una vez que estuve contenta con ello los pegué al papel. En la parte superior de ellos he añadido mi foto con un papel en la espalda con un par de pegatinas y una tarjeta.
Para añadir un toque rojo típico navideño, he añadido un título en rojo bajo el árbol. Por supuesto, un árbol de Navidad no está completo sin una estrella en la parte superior, ¿verdad? Un clip de papel en forma de estrella dorada resultó ser perfecto para esto. Para hacerlo más coherente, he añadido un toque dorado con algunos Rubb-ons en forma de estrella también. Fácil, pero bonito.

xoxo

Boo

Jan 6, 2014

1st XMAS

(entrada en español más abajo)

Good Morning,

This week I' ll be sharing a few of my favorite Christmas layouts. I didn't have enough time to complete a whole December Daily but at least I had the chance to scrap the most important moments of it.

So the first layout is focused on my niece's first Christmas. We were all excited about this although she is still too young to remember it. So I took a photo with her first Christmas present and I decided to make a layout inspired by Paige Taylor Evans layouts.


First, I cut out the letters from the white cardstock. I use some alphabet thickers to mark my tittle with a pencil and then I used a pair of scissors. Then I placed another piece of cardstock behind and I started placing red buttons and snowflake shaped wood veneers. It was my fist time using this technique and I really like the result although I think I can upgraded it the next time.


Apart from some snowflakes, I didn't wanted to use a lot of Christmassy elements because I think that sometimes it can get too saturated. So instead, I focused on using a red and woodgrain style to make my page.


Have I mentioned before how much I love using roller stamps? I think so, maybe a thousand times, right? hahaha In this page I used my AC Xmas roller stamp. It has the cutest phrases to add the date with some cute details.


I hope you had a beautiful Christmas!!

xoxo

Boo

///////////////////////////////////////////////////////////////////////////////////////////////////////////////////////////////////////////////////////////////////

Buenos días,

Esta semana compartiré algunas de mis paginas favoritas dedicadas a estas Navidades. Aunque me hubiera encantado, estas Navidades no he tenido tiempo suficiente para completar un diario de todo diciembre, pero al menos he tenido la oportunidad de scrapear los momentos más importantes.

Así pues, el primer diseño se centra en la primera Navidad de mi sobrina. Todos estábamos entusiasmados con ello a pesar de que sabíamos que todavía es demasiado pequeña para recordarlo. Tomé una foto con su primer regalo de Navidad y me decidí a hacer un diseño inspirado en las paginas de Paige Taylor Evans.
Primero, corté las letras de la cartulina blanca. Para ello use algunas letras de un alfabeto para marcar con lápiz mi titulo y después lo recorte con un par de tijeras. Después puse otro pedazo de cartulina detrás y empecé a colocar los botones rojos y las maderitas con forma de copo de nieve. La verdad ha sido la primera vez que he empleado esta técnica y me gusta mucho el resultado, aunque creo que puedo mejorarla para la próxima vez.
Aparte de algunos copos de nieve, no he querido utilizar una gran cantidad de elementos Navideños ya que para mi gusto, suele tender a quedar demasiado saturado. Así que en vez de eso, me he centrado en el uso del color rojo y vetas de la madera para hacer mi página.
¿He mencionado antes lo mucho que me encanta usar sellos de rodillos? Creo que sí, tal vez miles de veces, ¿no? jajaja En esta página he usado mi sello rodillo AC Navideño. Tiene las frases más monas para agregar la fecha con algunos detalles.

¡Espero que hayáis disfrutado de una Navidad inmejorable!

xoxo

Boo

Jan 3, 2014

Design Team (Biscuit Project DT)

(texto en español al final de la entrada)

Good Morning!

This is my very first post for Biscuit Project as part as its Design Team. So, to celebrate this moment, as it is also my first time as a member of a Design Team, I bring you this special page for me. To make this page I was inspired by this month's sketch by Biscuit Project (see the full post in their website here). And what did I used to create it? Well, I simply used the Biscuit Project January Scrap Non-stop kit (find it here). Here you have a peek on their awesome kit and you can find the sketch down as well.


So this is my approach:


I love love love the beautiful colors of this kit which is mainly composed by the Printshop collection by Studio Calico. I decided to go with a super girlie combo using the pinks, oranges and yellows of the kit.


That HappyMail stamp is just the cutest thing ever!! And with all the pen pals that I have and Christmas Cards that I wrote these days I really have already given it a really good use! The embellishment pack and the stickers / alphabet pack combine really well together and they allow you to create this complete pattern of elements.


The kit really has everything you need to create a beautiful page. The mini badges are just a plus to add the perfect touch and some dimension to your page.


I combined that bright colors with some black and white elements to add a bit of drama to the page. In fact, those splashes are blue but if you apply the spray really thick it seems like black! Great, two color in one spray ;)

xoxo

Boo

///////////////////////////////////////////////////////////////////////////////////////////////////////////////////////////////////////////////////////////////////

¡Buenos días!

Este es mi primer post para Biscuit Proyect como parte de su equipo de diseño. Así que, para celebrar este momento, ya que también es mi primera vez como miembro de un equipo de diseño, os traigo esta página tan especial para mí. Para que crear esta página me inspiré en el boceto de este mes de Biscuit Proyect (podeís encontrar su post aquí). ¿Y qué he usado para crearlo ? Bueno, pues por supuesto  sólo utilicé el Scrap Non- Stop kit de Biscuit Proyect de Enero. Aquí podéis echar un vistazo a su impresionante kit y el boceto a continuación. 

¡¡Me encanta los colores vivos de este kit compuesto principalmente por la colección Printshop de Studio Calico. Me decidí a usar  un combo súper "girlie" utilizando las rosas, naranjas y amarillos del kit.

¡El sello happymail es super chulo e imprescindible! Y con todos los amigos por correspondencia y tarjetas de Navidad que he escrito en estos días  realmente ya  le he dado un muy buen uso jaja El pack deadornos y el paquete de pegatinas / alfabeto combinan muy bien juntos y permite crear este una infinidad de combinaciones.
El kit realmente tiene todo lo necesario para crear una página increible. Las mini chapas son el toque perfecto y ayudan a dar dimensión a la página.
Combiné además los colores brillantes con algunos elementos en blanco y negro para añadir un poco de drama. De hecho, esas manchas son de color azul, pero si aplicas el spray muy espeso parece como si fuera negro. ¡Genial! Dos colores en un mismo spray ;)

xoxo

Boo

Jan 2, 2014

I love you more than ice cream

(texto en español al final de la entrada)

Merry Christmas and Happy New Year!

I know it has been a while since my last post but I got busier and busier during these weeks. You know how busy can the Holiday season get (too much excitement with the decoration, seeing all your family and friends, and buying a pile of presents for everyone) and also with all the things going on at my lab (experiments, conferences and trips to Germany),. But I think I am ready to start with a series of post s that I edited this past weekend.

So, today I wanted to share with you this simple layout that a made a few weeks ago with a bunch of leftovers from other projects.


For the background I used a leftover piece of fabric which had a huge hole in the middle. To cover it I placed on top two pieces of plain cardstock from a Studio Calico Card kit that I bought some while ago.


Then, I started playing with bits of paper, and when I finished,  I placed my photo on top of it. I couldn't resist adding that cute little camera clip. Isn't it the cutest clip ever? Some velum embellishments and wood veneers completed the right side of the photo.


I also used some mint feathers and enamel dots on the left top corner of the photo. The red-pink washi tape gives a pop of color to the whole mint-beige page. I also added some red-pink enamel dots on the opposite side of the page to make it more coherent.


I finished the page by first adding the title right on top of the fabric (decorated with a mint folded ribbon); and second, by writing my journaling next to the photo.

Simple, right?

xoxo

Boo

///////////////////////////////////////////////////////////////////////////////////////////////////////////////////////////////////////////////////////////////
Hola!

Ultimamente he estado muy ocupada debido a todo los experimentos que tengo que llevar a cabo estos días en el laboratorio, conferencias y viajes a Alemania por trabajo, a parte de todo lo que conlleva por si estas fechas: que si la decoración, que si las comidas o cafés con la familia y los amigos, que si las compras de los regalos para el Olentzero y los Reyes...., buff Pero creo poco a poco iré retomando el ritmo y os iré presentado unos post en los que he estado trabajando este último fin de semana. 

Así que, hoy quería enseñaos este layout que hice hace unas semanas con material que me había sobrado de unos proyectos anteriores.

Para la base he empleado una tela que tenía un agujero en medio. Así que lo he cubierto con dos cartulinas lisas que tenía de un Card kit de Studio Calico de hace algún tiempo (me lo compre por los sellos por eso no había ni usado las cartulinas jeje)

Después empece a jugar con diferentes trozo de papel que me habían sobrado, y coloqué mi fotografía encima. No pude resistirme a utilizar ese clip con forma de cámara. ¿No es el clip más mono del mundo? En el lado derecho de la foto también añadí unas formas de papel de cebolla y unos wood venners. Para completar el lado izquierdo, empleé unas plumas también de color mint y unos enamel dots.

The red-pink washi tape gives a pop of color to the whole mint-beige page. I also added some red-pink enamel dots on the opposite side of the page to make it more coherent.
I finished the page by first adding the title right on top of the fabric (decorated with a mint folded ribbon); and second by writing my journaling next to the photo.

Simple, ¿verdad?

xoxo

Boo