Showing posts with label Cards. Show all posts

Jan 15, 2016

January Gossamer Blue Blog Hop

Hello everyone!


It is time for a Gossamer Blue Blog Hop. Today, members of the Design Team are sharing some projects from the January Reveal Gallery to inspire you on different ways to use this month kits. As Valentine's day is getting closer and closer, I already started preparing a few love related cards, This month's kits is perfect for february and Valentine so I couldn't resist the opportunity.


Don't forget to visit the rest of the amazing projects presented today from the talented ladies on the design team:


Olatz Garaiyurrebaso (you are here)


xoxo

Olatz

Nov 15, 2015

November Gossamer Blue Blog Hop

Hello everyone!


It is time for a Gossamer Blue Blog Hop. Today, members of the Design Team are sharing some projects from the November Reveal Gallery to inspire you on different ways to use this month kits. The kits from this month were so fun to play with and I specially loved the endless possibilities of the 6x6 paper pad included in one of the add-ons. I created this card with just a single piece of paper. Cute but simple isn't it?


Don't forget to visit the rest of the amazing projects presented today from the talented ladies on the design team:


Olatz Garaiyurrebaso (you are here)


xoxo

Olatz

Jul 23, 2014

Pen-pals cards (Glitz Design CT)

Hello,

It has been a while since the last time I shared hand made cards here. But it doesn't mean that I stopped making them although I have to admit that I don't make them so frequently as before. But it is always nice to make cards for pen-pals, family and friends' birthdays or my favorites Christmas Greetings.


I created this set keeping in mind my previous page with Glitz Design (find it here). I liked so much the color palette of it that it totally inspired me to create a fun set of cards to send to a few of my pen-pals. I noticed the Fall or Halloweeny look of them but Hey! it is never too early to start preparing for the next season, right? ;)


When I create a set of cards I like to use the same sketch for all of them but ending up with completely different designs. For this one I chose to incorporate a 2" circle as the main focus of the page. To make give some texture to the cards I used pop dots for the circles to stand out a little bit more.


These cards are more or less 3,5" x 2,5" of size and for the background I used a mix of stickers and pieces of 6x6 papers. I love how tiny they are and how easy is to included them in an envelope with other goodies!


Thanks for watching!
xoxo

Boo

///////////////

Hola, 

Ha pasado un tiempo desde la última vez que compartí tarjetas hechas a mano por mí. Pero eso no quiere decir que haya dejado de hacerlas: aunque tengo que admitir que yo no las hago con tanta frecuencia como antes. Pero siempre es bueno hacer tarjetas para amigos por correspondencia, la familia y los cumpleaños de mis amigos o mis favoritas tarjetas Navideñas. 

He creado este conjunto teniendo en cuenta mi página anterior con Glitz Designs (podeís encontrar la aquí). Me gustó mucho la paleta de colores de la misma la cual me ha servido de inspiración para crear estas tarjetas divertidas que enviaré probablemente a algunos de mis amigos por correspondencia. Me di cuenta de que tenían un poco de aspecto otoñal o de Halloween , pero ¡oye! nunca es demasiado temprano para comenzar a prepararse para la próxima temporada, ¿no? ;) 

Cuando creo un set de tarjetas me gusta usar el mismo boceto para todas ellas, pero terminando con diseños completamente distintos. Para esto he optado por incorporar un círculo de 2 "como el foco principal de las mismas. Para darle un poco de textura a las tarjetas he empleado pop dots detrás de los círculos. Así, destacan un poco más. 

Estas tarjetas son más o menos de unos 3,5 "x 2,5" de tamaño y para el fondo he utilizado una mezcla de pegatinas y trozos de papeles de 6x6. ¡Me encanta lo pequeñas que son y lo fácil que me va a resultar incluirlas en un sobre con otros detalles para mis amigos! 

¡Gracias por estar ahí!
xoxo

Boo

Feb 18, 2014

Be my Valentine!!

(texto en español al final de la entrada)


Oh Happy Love Day!!!

I know I know... Valentine's Day was the last Friday but as I din't have the chance to celebrate it on that day I didn't have the rush neither to prepare everything for the 14th. But finally  I completed it and I'm so happy with the little package I created and all I want to do now is give it to my boy. In fact. I hope he is not reading this because I have to wait a few more days to celebrate this special day hehe So, what's inside the bag?


All these goodies!! I got inspired by the Lindsay Letters "I'll eat you up I love you so"card. I chose a lot gold embellishments, red, white and pink... and lots of sweets of course!  I also had fun adding confetti because it is a day to celebrate, right?  A handmade envelope and card, some cute "Wild Thing, You make my heart sing" tags attached to a Pascal figure from the movie Tangled (Disney), heart shaped sweets, chocolates and a couple of cupcakes. As I said before I love pom-poms so I attached a couple of them to a pair of spoons. How cute are those? To decorate the outside of the bag I mainly used Studio Calico and Dear Lizzy products. Cute pie!


Now, I leave you with more in detail photos! I hope you had fun on the 14th with the people you love the most!

xoxo

Boo


////////////////////////////////////

¡Oh, Feliz Dia del Amor !!

Ya sé, ya sé... el Día de San Valentín fue el viernes pasado, pero como tuve la oportunidad de celebrarlo ese día, tampoco tenía prisa para preparar todo para el día 14. Pero al fin lo he terminado y estoy super contenta con el pequeño paquete que he creado y todo lo que quiero hacer ahora es darselo a mi chico. De hecho espero que no esté leyendo esto porque aun toca esperar unos días más para celebrar este día tan especial jeje Pero entonces, ¿qué hay dentro de la bolsa?

¡Todas estas golosinas! Me inspiré en la tarjeta de Lindsay Letters que quiere decir "Te voy a comer Te quiero tanto ". Elegí muchos adornos dorados, rojos, blancos y rosas... y ¡un montón de dulces por supuesto! También me he divertido añadiendo un montón de confeti porque es un día para celebrar, ¿no? Un sobre hecho a mano y la tarjeta, algunas tarjetas atadas a una figura de Pascal de la película Enredados (Disney), dulces en forma de corazón, chocolates y un par de magdalenas. Como ya he dicho anteriormente me encantan los pompones y me animé a atar un par de ellos a unas cucharas. ¿A que quedan monas? Para decorar el exterior de la bolsa usé principalmente adornos de Studio Calico y Dear Lizzy!

Ahora, os dejo con más fotos en detalle. ¡Espero que os hayáis divertido el dia 14 con la gente que más queréis!

xoxo

Boo

Feb 15, 2014

Travel Girls (Biscuit Project DT)

(texto en española al final de la entrada)

Hi there!

Today I am bringing you another fun project made with the February Scrap Non-Stop kit from Biscuit Project. February has been a crazy month, full of work so I din't have enough time to work with this kit as much as I wanted. But in the end I managed to find some spare time to make this super quick and easy card.


I mainly used the Wanderlust collection from Studio Calico. Aren't those stitched frames the cutest frames ever? I placed the frame on top of a cute paper from the same collection and I added a little badge which was not included in the kit but it coordinated so well with the colors of the card that I couldn't resist using it!


Those ink splashes were made with the Mr. Huey included in the Biscuit Project January kit as the Neon Pink Dauber didn't work well with this card.


In the end I am thinking of using it as a mini album cover.  It would work really well with some old photos of my friends and I traveling the world. What do you think?

xoxo

Boo


//////////////////////////

¡Hola! 

Hoy os traigo otro proyecto divertido hecho con el kit de febrero de Biscuit Project. Este mes ha sido un mes de locura y de trabajo por lo que no he tenido tiempo suficiente para trabajar con este kit tanto como yo hubiera querido. Pero al final me las arreglé para encontrar un poco de tiempo libre para hacer esta tarjeta muy rápida y fácil. 

He utilizado principalmente la colección de Wanderlust de Studio Calico. ¿No son esos marcos con elementos cosidos los marcos más monos del mundo? Coloqué el marco sobre un papel de la misma colección y añadí una pequeña chapa que no estaba incluido en el kit pero que coordinaba tan bien con los colores de la tarjeta que ¡no me pude resistir!
Hice esas salpicaduras de tinta con el Sr. Huey incluido en el kit de enero de Biscuit Projecto ya que el Dauber rosa Neon no funcionaba bien con este proyecto. 

Al final estoy pensando en usarlo como portada de un mini álbum, ya que creo que funcionaría muy bien con algunas fotos viejas  de mis amigos y yo viajando por el mundo. ¿Qué os parece? 

xoxo

Boo

Jul 5, 2013

F is for fairies

Hello!


Today I am sharing the third and last one card/home decor that I made a couple of weeks ago as a part of a trio. Check this and this to see the details of the two previously published. 

I made this inspired on the days when my sister was buying new things for the baby room. And I decided to try to do some cute cards that can be framed as well and placed on a baby's room wall. Don't you think these could be part of the decoration? Such a cute deco with the little Fairies. Today F is for fairies!


Before I started playing with the beautiful fairy image from Mo's Digital Pencil, which I colored with Copics, I decided which elements I wanted to have on the card:

- big and pop-out embellishment
- punched butterflies
- handmade card (with paint)
- gold glitter
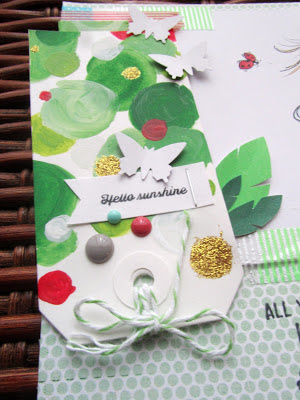
- hello sunshine banner
- spring relatedstamp
- 3 different but coordinated washi tapes
- 3 enamel dots (color shades)

So on the next photos I will show you all these elements...can you spot them?


Fun, right? I specially like this one because it is so girly and pink as all my niece's new things. Have you ever try to do play with the same sketch in different projects or shades? It is truly a technique that I love. So many possibilities!


xoxo

Boo

P.D. Here you can see the card trio ;) 


Entering this card to the next challenge: Mo's Digital Challenge #192 F is for...

Jun 27, 2013

Remember you are loved

What a happy day!!


Yesterday was such a good day that when I got home I made a happy/party card to say : remember you are loved! Because sometimes people forget about this. And it is always fun to say I LOVE YOU ;)  This could be also a cute insert  (4x6) on a Project Life spread on these summer days.


It is such a simple design that it only took like 15 minutes to finish it. To make something like this you will only need: 
- kraft paper 
- doilies
- stickers
- twine
- little stamps

                                                                                             
One thing that I LOVE to do is to add different textures and dimensions. It could make a kind of lame page look totally different.


xoxo

Boo


Fun in the sun

Good afternoon everyone,

Today I am sharing the second card/home decor that I made a couple of weeks ago. And is it the second one? The second one of what? Well this is part of a three card pack so to see the first one click here and for the third one...you will have to wait one week more ;)

I made this inspired on the days when my sister was buying new things for the baby room. And I decided to try to do some cute cards that can be framed as well and placed on a baby's room wall. Don't you think these could be part of the decoration? 


Before I started playing with the beautiful fairy image from Mo's Digital Pencil, which I colored with Copics, I decided which elements I wanted to have on the card:

- big and pop-out embellishment
- punched butterflies
- handmade card (with paint)
- gold glitter
- hello sunshine banner
- spring relatedstamp
- 3 different but coordinated washi tapes
- 3 enamel dots (color shades)


So on the next photos I will show you all these elements...can you spot them?


Although, I normally do layouts of different projects with photos and memories once in a while I love to color or draw pretty images and create beautiful cards or gifts to makes the ones I love happy! It really lets me be more creative and feel like a kid again when I was drawing all the time in my school books.

xoxo

Boo

Entering this card into the next challenge:
Mo's Digital Challenge #191 Fun in the sun
Simon says...Anything goes

Jun 22, 2013

Bright colors

Good morning everyone,

Feeling good on a Saturday morning! I looooove those moments when you feel you could sleep all day  'cause you don't have to wake up early to go to work...lovely!

Today I am sharing a beautiful card/home decor that I made a couple of weeks ago. This is actually part of a trio...so don't miss out next posts if you wanna see the whole pack ;) I made this inspired on the days when my sister was buying new things for the baby room. And I decided to try to do some cute cards that can be framed as well and placed on a baby's room wall. Don't you think these could be part of the decoration? 


Before I started playing with the beautiful fairy image from Mo's Digital Pencil, which I colored with Copics, I decided which elements I wanted to have on the card:

- big and pop-out embellishment
- punched butterflies
- handmade card (with paint)
- gold glitter
- hello sunshine banner
- spring relatedstamp
- 3 different but coordinated washi tapes
- 3 enamel dots (color shades)


So on the next photos I will show you all these elements...can you spot them?


Fun, right? In the end I got excited and I created 3 of them!! ...as I mentioned before and you will be able to find those elements on the other two cards although in different color shades and with different fairies.


xoxo

Boo

Entering this card on the next Challenge:
Mo´s Challenge #190 Bright Colors w/Mo Image

Feb 14, 2013

This is why I love you!

Happy Valentine's Day everyone!

I hope you all are having a beautiful day wether you are celebrating Valentine's ore not.  I don't see this day only as a day to celebrate if you have a couple but also as a day to enjoy with the people you love the most. 


You can find this cute image on Mo's Digital Pencil Store (Digital Image) but if you prefer it as a stamp I think you can also find it in the penny Black store. I colored mine with bright Copic colors because it is always a happy day to remember.


My favorite Valentine's Day in my life was the one I spent in Texas with my boyfriend 2 years ago. He prepared a huge surprise for me which ended up in a fantastic picnic in front of the campus tower... but right now he is on the other side of the world so... I think I will have to wait a bit longer to celebrate Valentine's this year!


Anyway, today it is also one of my best friends' birthday so I wanted to share this card for him too. Happy birthday!! :)

   And please don't be afraid to say I LOVE YOU!!

Best,

Boo

Entering this card in the next challenges:

Jan 30, 2013

Happy New Year...

Happy New Year everyone!!!

...and yeah I know it is almost February! But you know, you start with a 2 week break of crafting for Christmas and it endes up being a month break.  However I have to say I have enjoyed most of this time (it is never fun to spend some weekends at the lab working for hours). 
Anyway here I show you a double project: a little card and a 12x12 layout.

Happy 2013!! I hope you like these little fairies that I created by myself (Copyright reserved) Yaaay!! It was so much fun to draw them. Lately I've been thinking of start selling some of my images so message me if you are interested.


I colored them with Copics and finally which in fact was the most complicated part, I added on some feathers. I love that effect :) 


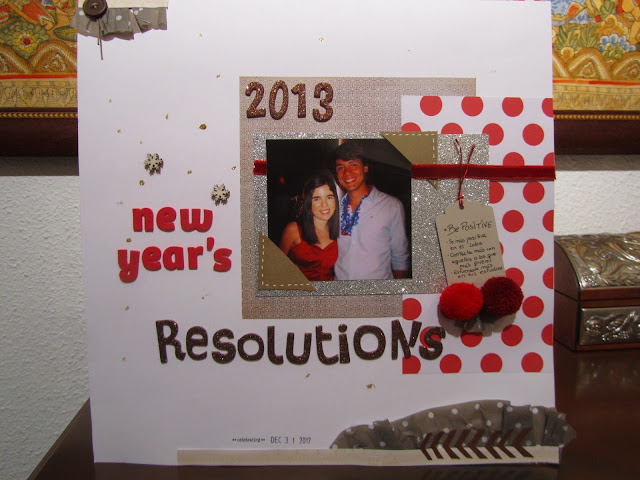
Secondly, I wanted to make a layout inspired by those new year's resolutions that everyone make on New Year's Eve.. and the ones that do not normally make it through the first month.  I also got inspired by a beautiful layout that Elisabeth from Dear Lizzy did a few days on the 2peas in a bucket website. Did you watch the video? Love it!!


On the little tag I wrote some of the most important ones which have to last at least this first semester. Here you can see some of the embellishments that I combined. The wood veneers and the chevron are some of the most popular trends right now. So here they are!


 I hope you enjoyed this first month of the amazing year that we are starting!!

Best,

Boo