Showing posts with label Copics. Show all posts

Jul 5, 2013

F is for fairies

Hello!


Today I am sharing the third and last one card/home decor that I made a couple of weeks ago as a part of a trio. Check this and this to see the details of the two previously published. 

I made this inspired on the days when my sister was buying new things for the baby room. And I decided to try to do some cute cards that can be framed as well and placed on a baby's room wall. Don't you think these could be part of the decoration? Such a cute deco with the little Fairies. Today F is for fairies!


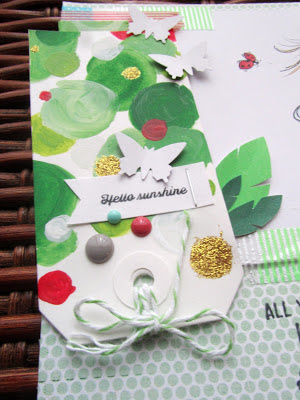
Before I started playing with the beautiful fairy image from Mo's Digital Pencil, which I colored with Copics, I decided which elements I wanted to have on the card:

- big and pop-out embellishment
- punched butterflies
- handmade card (with paint)
- gold glitter
- hello sunshine banner
- spring relatedstamp
- 3 different but coordinated washi tapes
- 3 enamel dots (color shades)

So on the next photos I will show you all these elements...can you spot them?


Fun, right? I specially like this one because it is so girly and pink as all my niece's new things. Have you ever try to do play with the same sketch in different projects or shades? It is truly a technique that I love. So many possibilities!


xoxo

Boo

P.D. Here you can see the card trio ;) 


Entering this card to the next challenge: Mo's Digital Challenge #192 F is for...

Jun 27, 2013

Fun in the sun

Good afternoon everyone,

Today I am sharing the second card/home decor that I made a couple of weeks ago. And is it the second one? The second one of what? Well this is part of a three card pack so to see the first one click here and for the third one...you will have to wait one week more ;)

I made this inspired on the days when my sister was buying new things for the baby room. And I decided to try to do some cute cards that can be framed as well and placed on a baby's room wall. Don't you think these could be part of the decoration? 


Before I started playing with the beautiful fairy image from Mo's Digital Pencil, which I colored with Copics, I decided which elements I wanted to have on the card:

- big and pop-out embellishment
- punched butterflies
- handmade card (with paint)
- gold glitter
- hello sunshine banner
- spring relatedstamp
- 3 different but coordinated washi tapes
- 3 enamel dots (color shades)


So on the next photos I will show you all these elements...can you spot them?


Although, I normally do layouts of different projects with photos and memories once in a while I love to color or draw pretty images and create beautiful cards or gifts to makes the ones I love happy! It really lets me be more creative and feel like a kid again when I was drawing all the time in my school books.

xoxo

Boo

Entering this card into the next challenge:
Mo's Digital Challenge #191 Fun in the sun
Simon says...Anything goes

Jun 22, 2013

Bright colors

Good morning everyone,

Feeling good on a Saturday morning! I looooove those moments when you feel you could sleep all day  'cause you don't have to wake up early to go to work...lovely!

Today I am sharing a beautiful card/home decor that I made a couple of weeks ago. This is actually part of a trio...so don't miss out next posts if you wanna see the whole pack ;) I made this inspired on the days when my sister was buying new things for the baby room. And I decided to try to do some cute cards that can be framed as well and placed on a baby's room wall. Don't you think these could be part of the decoration? 


Before I started playing with the beautiful fairy image from Mo's Digital Pencil, which I colored with Copics, I decided which elements I wanted to have on the card:

- big and pop-out embellishment
- punched butterflies
- handmade card (with paint)
- gold glitter
- hello sunshine banner
- spring relatedstamp
- 3 different but coordinated washi tapes
- 3 enamel dots (color shades)


So on the next photos I will show you all these elements...can you spot them?


Fun, right? In the end I got excited and I created 3 of them!! ...as I mentioned before and you will be able to find those elements on the other two cards although in different color shades and with different fairies.


xoxo

Boo

Entering this card on the next Challenge:
Mo´s Challenge #190 Bright Colors w/Mo Image

Feb 14, 2013

This is why I love you!

Happy Valentine's Day everyone!

I hope you all are having a beautiful day wether you are celebrating Valentine's ore not.  I don't see this day only as a day to celebrate if you have a couple but also as a day to enjoy with the people you love the most. 


You can find this cute image on Mo's Digital Pencil Store (Digital Image) but if you prefer it as a stamp I think you can also find it in the penny Black store. I colored mine with bright Copic colors because it is always a happy day to remember.


My favorite Valentine's Day in my life was the one I spent in Texas with my boyfriend 2 years ago. He prepared a huge surprise for me which ended up in a fantastic picnic in front of the campus tower... but right now he is on the other side of the world so... I think I will have to wait a bit longer to celebrate Valentine's this year!


Anyway, today it is also one of my best friends' birthday so I wanted to share this card for him too. Happy birthday!! :)

   And please don't be afraid to say I LOVE YOU!!

Best,

Boo

Entering this card in the next challenges:

Jan 30, 2013

Happy New Year...

Happy New Year everyone!!!

...and yeah I know it is almost February! But you know, you start with a 2 week break of crafting for Christmas and it endes up being a month break.  However I have to say I have enjoyed most of this time (it is never fun to spend some weekends at the lab working for hours). 
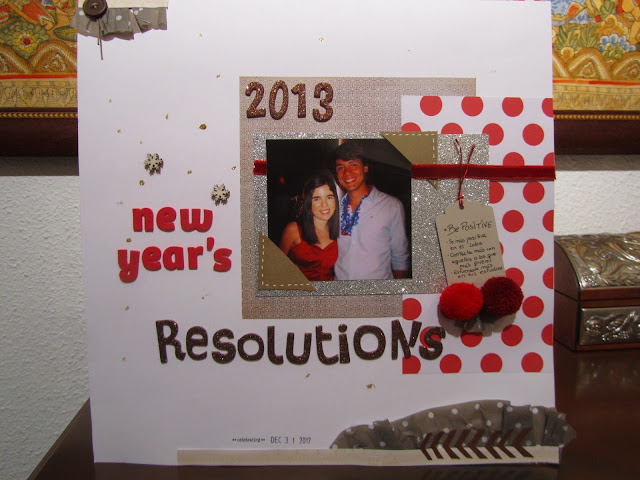
Anyway here I show you a double project: a little card and a 12x12 layout.

Happy 2013!! I hope you like these little fairies that I created by myself (Copyright reserved) Yaaay!! It was so much fun to draw them. Lately I've been thinking of start selling some of my images so message me if you are interested.


I colored them with Copics and finally which in fact was the most complicated part, I added on some feathers. I love that effect :) 


Secondly, I wanted to make a layout inspired by those new year's resolutions that everyone make on New Year's Eve.. and the ones that do not normally make it through the first month.  I also got inspired by a beautiful layout that Elisabeth from Dear Lizzy did a few days on the 2peas in a bucket website. Did you watch the video? Love it!!


On the little tag I wrote some of the most important ones which have to last at least this first semester. Here you can see some of the embellishments that I combined. The wood veneers and the chevron are some of the most popular trends right now. So here they are!


 I hope you enjoyed this first month of the amazing year that we are starting!!

Best,

Boo


Dec 23, 2012

Starting the Count Down

Hi Friends,

this is just a quick post to show you how I've been getting everything ready for Christmas.
These days I have been busy playing around with several things:

First, I wanted to turn my favorite cupcake recipes into Christmas cupcakes, so I decided to make Mini Christmas Tree Cupcakes!!! Delicious and perfect for Christmas dessert!

They are Chocolate Cupcakes with Vanilla Buttercream (a simple recipe in order to make a whole bunch of them for Christmas).
I added some green color to the buttercream to resemble tiny trees, sprinkles as ornaments and I made a White Chocolate star which I placed just above all.
Second, I made also a whole bunch of easy and quick Christmas cards to send to my family and friends. They are easy to send because they don't have to much embellishments or things that may end loose through the travel :) However, I think they are vey cute!

Supplies: Penny Black stamps, Copics, Digital sentiments, Martha Stewart Snowflake Punch, Distress Ink, The Paper Studio Patterned Paper, Sleight bells.
At last but not least I made my own Door Wreath!!! As i live in a flat I didn't wanted to put in my front door so I hang it above the doors between the entrance and the living room as a way to welcome everyone.


It was my first time so it was so much fun to make and to design ... although due to this project I think I have become a little bit obsessed with pom pom!! I started making all the other elements like the felt flowers, or the rolled fabrics flowers, the snowflake, ribbon made candy canes and the Merry Christmas tag with the Sleight Bells, but I didn't know what to add to cover all the little gaps between them. So I thought that covering them with pom pom will be a good idea. And that is! I love them!! And there are a lot of different range of colors and sizes... just wonderful! 


I hope you are enjoying these days as much as I do or even more!! And remember to add some cute pom pom to your projects!

Hugs, 

Boo

Challenges:
Simon Says Stamp Challenge: Merry Christmas
Challenge #9 :: Anything Goes + Red
Divas by Design Challenge: Anything Goes 
Totally Gorjuss: Easy Does it

Dec 14, 2012

Oh Christmas Tree

Hi Friends,

today I bring you one of the last card/home decor that I would create for this Christmas. I chose again the Winter Fairy from the incredible Mo Manning. Sorry, I am just in love with them.  I can imagine lots and lots of projects where they would fit just perfectly amazing.

Supplies: Winter Fairy Halla stamp, Copics, Wow glitter, American
Crafts Ribbon Distress Inks, other embellishments.

I tried to paired t with one of my previous creations with the Winter Fairy Halla aslso from Mo Manning that you can find here on my blog. I was deciding which shape should I try this time and... I realized that I didn't have any Christmas tree on any of my creations for this Christmas!! So here it is.


As you can see in this photo, I play with some Christmas inspired papers to create the clothes of the Fairy, the tree and the star. I also used some Distress Inks to give them a kind of vintage or old fashioned look. I really like it for a more traditionally inspired Christmas, don't you think?


For the fluffy sock I used red glitter with Copics and Distress Inks to give her more personality. And to pop up the snow on her wing I just used white glitter from American crafts. 
Background: my Christmas tree!!
 I think I found the place where I want to stand this little fairy with her tree...and what a better place than this one... just next to my tree! Can you see it in the background?
Hugs,


Boo

Entering this card to the following challenges:

Dec 13, 2012

Christmas happiness

Hi Friends!!

Today I wanted to share a layout that I made with one of my favorite photos from last year's Christmas.... a photo with one of my favorite persons in the world!! 


Christmas isn't Christmas if you can't enjoy it with the people you love the most, right? Here you can find a closer view of the Penny Black stamp that I used called Snow Kiss.
 Supplies: Copics Sketch Markers : B00, B02, B05, E00, E11, E13, 15, E18, R20, R22, R27, R29.


As always, I tried to give some 3-D effect or layered effect to some details of my projects. And the snow is colored with white paint. It is always so much fun to make :) 

This time I also used a snowflake punch from Martha Stewart for the tiny details. The basics are some basic blue cardstock, craft cardstock (wich I distressed and added some merry christmas stamped quotes from Penny Black too ) and vellum paper (also punch with the MS punch in the corners). 


The little Robin is also from the collection called  The Wonder from Penny Black. 

Thanks for visiting!! And don't forget to do something creative everyday. 

Hugs,

Boo

Dec 2, 2012

It's the Most Wonderful Time of the Year

Hi Friends,

Happy First Weekend of December!! yaaaaiiih I am so excited about Christmas because the count down has already started. "It's the most wonderful time of the year..."
I didn't have much time these days to start an advent calendar so today I'll show you another card/home decorations for these holidays. 

This card is paired with another one I did some weeks ago which you can see here on my blog. 


The difference is that this time I tried to combine more boy-like-colors as red and brown. I think it is a really good color combinations for these holidays too. The colors, feathers and the oldish deer tag create a vintage effect which I really enjoy creating. Do you see also the little red sleight bell between the Winter tickets?
Supplies: Fairy Winter stamp, Copics, Snowflake punch from Martha Stewart, Wow glitter, Feathers, Fabric Flowers and Felt flowers, Sleight bell, American crafts Ribbons, Distress Inks, other embellishments.

The little fairy is from  Mo Manning and I printed the cute image on X-Press It Paper and then colored with Copic markers. Some glitter was added to his wings and dress for a magical sparkle.
Copics used: R20, R22, R27, R29, E00, E11, E13, E15, E49, BG000, E43, C1, C3

In this photo you can appreciate the 3-D effect created by the feathers and all other embellishments.  I love the tiny bottles with fairy dust!! They are just perfect for this fairy theme project and I am sure that I will include them in many more projects.


 That's all for now. I hope you enjoy it. Thanks for watching!


“Christmas doesn't come from a store, maybe Christmas perhaps means a little bit more....” 


Hugs,

      Boo


Entering this card to the following challenges:
Mo's Digital Challenge: Challenge #163 - Favorite Color Combo
Sparkles Monthly Challenge: Christmas is Coming
Party Time Tuesdays:#96 Anything Goes
Flutter By Wednesday #216
Tuesday Throwdown #125 lots of Layers
Divas by Design:#63 glitter ans Sparkle
Dilly Bean Challenges: Layers and pop Dot Challenge
Totally Gorjuss: Challenge 160 - anything goes....with glitter!
Challenges4everybody: Anything goes
PapercraftJunkies Challenge Blog: Embellish it
The Ribbon Girl Challenge: HOHOHO
Craft and me Challenges: Ribbon or Trim
Oozak Chalenge December: Anything goes + red
Penny Black Saturday Challenge: Glitter and Sparkle

Nov 24, 2012

Let it Snow, Let it Snow, Let it Snow

Hi friends,


I hope everyone is having a great weekend. My weekend is also going pretty well although I am trying to spend as much time as I can relaxing and not doing pretty much anything. I know, I know.... weekends are to enjoy and to spend time with all your friends and family. But since I had a very stressful week at the lab (I am a PhD student, so you can imagine), I think I deserve some calm.

And keeping in mind this week's Mo Digital blog's fun and fabulous challenge which is Don't be Square, I decided to play with my Winter Fairy Halla stamp. 


Supplies: Fairy Winter stamp, Copics, Wow glitter, Ribbon, White paint, 2 Patterned Papers,  Cardstock, and Distress Inks.

At first I didn't know which shape I wanted to use (a Christmas sock, tree, wreath...) but  I really like how this project turned out in the end. Isn't the Snowflake shaped card cute? And it is also very versatile: you can use it as a Christmas Card, as a Christmas decoration or even as a centerpiece. 

This is how I manage to pop it out. As you can see from my previous card I like to create a 3-D kind of image or just to try to give it some dimension. 


As you can also appreciate from the photo, I didn't use Copics this time to color the Fairy clothing. Instead, I stamped the image on the same patterned paper as the one I used for the Snowflake to link the fairy to the winter background. For the fluffy sock ties I used a red patterned paper to give him more personality.


Well, the weather outside is frightful, but the browser is so delightful. 
And since we've no place to go,  
Let it snow, Let it snow, Let it snow. 
Hugs,


  Boo

Entering this card to the following challenges:

Nov 18, 2012

Believe in the Magic of Christmas

Hi friends,

although we are still in the middle of November, it is starting to smell like Christmas around town!! Don't you think? And I couldn't be more excited!! I love Christmas lights, all the beautiful decorations around the town and of course all the Christmas goodies that the markets are now starting to sell. So this weekend I decided to play with my own homemade Christmas cards and decorations...or with both combined in the same projects!

This time I chose this Winter Fairy from Penny Black. Actually these fairies are designed from the incredible Mo Manning. They are gorgeous!

Supplies: Fairy Winter stamp, Copics, Snowflake punch from Martha Stewart, Wow glitter, Feathers, Ribbon Flowers and Felt flowers, Sleight bell, American crafts Ribbon, Distress Inks.

Lately I have been a little obsessed with two colors: aqua mint and strawberry-like-red. They are very soft colors and they combined really well together. 


Also, the other day I went to a little crafty shop at my hometown where I found these awesome feathers of different colors and the tiny bottles which I filled with some fairy dust!! They are just perfect for this fairy theme project.
Do you see also the little red sleight bell between the Winter tickets?

Here there is a close up of the stamped imaged which I colored with copics.  

Copics: B000, BG11, BG13,E00, E11,  E13, E15, E18,  R20, R22, R27, R29

I hope you are getting ready for some good Christmas!!

“I wonder if the snow loves the trees and fields, that it kisses them so gently? And then it covers them up snug, you know, with a white quilt; and perhaps it says "Go to sleep, darlings, till the summer comes again.” ― Lewis Carrol

 Hugs,


      Boo

Entering this card for the following challenges:

Challenge #161 - Let's "Chill" w/Mo image
Challenge 61 Anything goes